我们使用 WiX 已经有一段时间了,尽管通常会抱怨易用性,但它运行得相当好。我正在寻找的是关于以下方面的有用建议:
- 设置 WiX 项目(布局、参考、文件模式)
- 将 WiX 集成到解决方案和构建/发布流程中
- 为新安装和升级配置安装程序
- 您想分享的任何好的 WiX hack
将变量保存在单独wxi的包含文件中。可以重复使用,变量查找速度更快,并且(如果需要)允许通过外部工具更轻松地进行操作。
为 x86 和 x64 构建定义平台变量
<!-- Product name as you want it to appear in Add/Remove Programs-->
<?if $(var.Platform) = x64 ?>
  <?define ProductName = "Product Name (64 bit)" ?>
  <?define Win64 = "yes" ?>
  <?define PlatformProgramFilesFolder = "ProgramFiles64Folder" ?>
<?else ?>
  <?define ProductName = "Product Name" ?>
  <?define Win64 = "no" ?>
  <?define PlatformProgramFilesFolder = "ProgramFilesFolder" ?>
<?endif ?>
将安装位置存储在注册表中,使升级能够找到正确的位置。例如,如果用户设置自定义安装目录。
 <Property Id="INSTALLLOCATION">
    <RegistrySearch Id="RegistrySearch" Type="raw" Root="HKLM" Win64="$(var.Win64)"
              Key="Software\Company\Product" Name="InstallLocation" />
 </Property>
注意:WiX 大师Rob Mensching发布了一篇出色的博客文章,其中更详细地介绍了从命令行设置属性时的边缘情况。
使用 1. 2. 和 3 的示例。
<?include $(sys.CURRENTDIR)\Config.wxi?>
<Product ... >
  <Package InstallerVersion="200" InstallPrivileges="elevated"
           InstallScope="perMachine" Platform="$(var.Platform)"
           Compressed="yes" Description="$(var.ProductName)" />
和
<Directory Id="TARGETDIR" Name="SourceDir">
  <Directory Id="$(var.PlatformProgramFilesFolder)">
    <Directory Id="INSTALLLOCATION" Name="$(var.InstallName)">
最简单的方法总是进行重大升级,因为它允许在单个 MSI 中进行新安装和升级。UpgradeCode固定为唯一的 Guid 并且永远不会改变,除非我们不想升级现有产品。
注意:在 WiX 3.5 中有一个新的MajorUpgrade元素,它让生活更加轻松!
在添加/删除程序中创建图标
<Icon Id="Company.ico" SourceFile="..\Tools\Company\Images\Company.ico" />
<Property Id="ARPPRODUCTICON" Value="Company.ico" />
<Property Id="ARPHELPLINK" Value="http://www.example.com/" />
在发布版本中,我们对安装程序进行版本控制,将 msi 文件复制到部署目录。使用从 AfterBuild 目标调用的 wixproj 目标的示例:
<Target Name="CopyToDeploy" Condition="'$(Configuration)' == 'Release'">
  <!-- Note we append AssemblyFileVersion, changing MSI file name only works with Major Upgrades -->
  <Copy SourceFiles="$(OutputPath)$(OutputName).msi"
        DestinationFiles="..\Deploy\Setup\$(OutputName) $(AssemblyFileVersion)_$(Platform).msi" />
</Target>
使用 heat 收集带有通配符 (*) Guid 的文件。如果您想跨多个项目重用 WXS 文件,这很有用(请参阅我对同一产品的多个版本的回答)。例如,此批处理文件自动收集 RoboHelp 输出。
@echo off
robocopy ..\WebHelp "%TEMP%\WebHelpTemp\WebHelp" /E /NP /PURGE /XD .svn
"%WIX%bin\heat" dir "%TEMP%\WebHelp" -nologo -sfrag -suid -ag -srd -dir WebHelp -out WebHelp.wxs -cg WebHelpComponent -dr INSTALLLOCATION -var var.WebDeploySourceDir
有一些事情发生,robocopy在收获之前剥离 Subversion 工作副本元数据;根-dr目录引用设置为我们的安装位置,而不是默认的 TARGETDIR;-var用于创建变量以指定源目录(Web 部署输出)。
通过使用 Strings.wxl 进行本地化,可以轻松地将产品版本包含在欢迎对话框标题中。(信用:saschabeaumont。添加,因为这个很棒的提示隐藏在评论中)
<WixLocalization Culture="en-US" xmlns="http://schemas.microsoft.com/wix/2006/localization">
    <String Id="WelcomeDlgTitle">{\WixUI_Font_Bigger}Welcome to the [ProductName] [ProductVersion] Setup Wizard</String>
</WixLocalization>
省去一些痛苦,并遵循Wim Coehen 关于每个文件一个组件的建议。这也允许您省略(或通配符*)组件 GUID。
Rob Mensching 有一种巧妙的方法,可以通过搜索value 3. 请注意有关国际化的注释。
添加条件功能时,将默认功能级别设置为 0(禁用),然后将条件级别设置为您想要的值会更直观。如果您将默认功能级别设置为 >= 1,则条件级别必须为 0 才能禁用它,这意味着条件逻辑必须与您期望的相反,这可能会令人困惑:)
<Feature Id="NewInstallFeature" Level="0" Description="New installation feature" Absent="allow">
  <Condition Level="1">NOT UPGRADEFOUND</Condition>
</Feature>
<Feature Id="UpgradeFeature" Level="0" Description="Upgrade feature" Absent="allow">
  <Condition Level="1">UPGRADEFOUND</Condition>
</Feature>
Checking if IIS is installed:
<Property Id="IIS_MAJOR_VERSION">
    <RegistrySearch Id="CheckIISVersion" Root="HKLM" Key="SOFTWARE\Microsoft\InetStp" Name="MajorVersion" Type="raw" />
</Property>

<Condition Message="IIS must be installed">
    Installed OR IIS_MAJOR_VERSION
</Condition>
Checking if IIS 6 Metabase Compatibility is installed on Vista+:
<Property Id="IIS_METABASE_COMPAT">
<RegistrySearch Id="CheckIISMetabase" Root="HKLM" Key="SOFTWARE\Microsoft\InetStp\Components" Name="ADSICompatibility" Type="raw" />
</Property>
<Condition Message="IIS 6 Metabase Compatibility feature must be installed">
Installed OR ((VersionNT < 600) OR IIS_METABASE_COMPAT)
</Condition>
Keep all IDs in separate namespaces
F. Examples: F.Documentation, F.Binaries, F.SampleCode. C. Ex: C.ChmFile, C.ReleaseNotes, C.LicenseFile, C.IniFile, C.RegistryCA. Ex: CA.LaunchHelp, CA.UpdateReadyDlg, CA.SetPropertyXFi. Di.I find this helps immensely in keeping track of all the various id's in all the various categories.
很棒的问题。我很想看到一些最佳实践。
我有很多要分发的文件,所以我将我的项目设置为几个 wxs 源文件。
我有一个名为 Product.wxs 的顶级源文件,它基本上包含安装结构,但不包含实际组件。该文件有几个部分:
<Product ...>
  <Package ...>
    <Media>...
   <Condition>s ...
   <Upgrade ..>
   <Directory>
        ...
   </Directory>
   <Feature>
      <ComponentGroupRef ... > A bunch of these that
   </Feature>
   <UI ...>
   <Property...>
   <Custom Actions...>
   <Install Sequences....
  </Package>
</Product>
.wix 文件的其余部分由包含在 Product.wxs 的 Feature 标记中引用的 ComponentGroups 的 Fragment 组成。我的项目包含我分发的文件的一个很好的逻辑分组
<Fragment>
   <ComponentGroup>
     <ComponentRef>
     ....
    </ComponentGroup>
    <DirectoryRef>
      <Component... for each file
      ....
    </DirectoryRef>
</Fragment>
这并不完美,我的 OO 蜘蛛感觉有点刺痛,因为片段必须引用 Product.wxs 文件中的名称(例如 DirectoryRef),但我发现维护单个大型源文件更容易。
我很想听听对此的评论,或者如果有人也有任何好的建议!
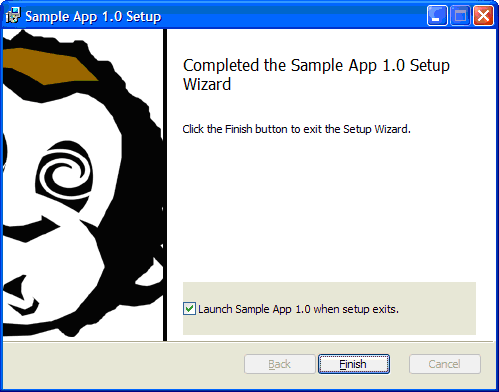
在退出对话框中添加一个复选框以启动应用程序或帮助文件。
...
<!-- CA to launch the exe after install -->
<CustomAction Id          ="CA.StartAppOnExit"
              FileKey     ="YourAppExeId"
              ExeCommand  =""
              Execute     ="immediate"
              Impersonate ="yes"
              Return      ="asyncNoWait" />

<!-- CA to launch the help file -->
<CustomAction Id         ="CA.LaunchHelp"
              Directory  ="INSTALLDIR"
              ExeCommand ='[WindowsFolder]hh.exe IirfGuide.chm'
              Execute    ="immediate"
              Return     ="asyncNoWait" />

<Property Id="WIXUI_EXITDIALOGOPTIONALCHECKBOXTEXT"
          Value="Launch MyApp when setup exits." />

<UI>
  <Publish Dialog  ="ExitDialog"
           Control ="Finish"
           Order   ="1"
           Event   ="DoAction"
           Value   ="CA.StartAppOnExit">WIXUI_EXITDIALOGOPTIONALCHECKBOXTEXT</Publish>
</UI>
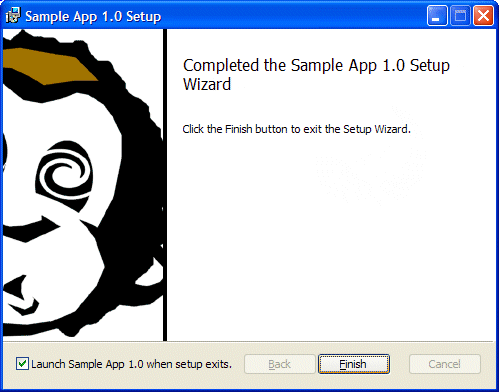
如果你这样做,“标准”外观就不太对了。复选框始终为灰色背景,而对话框为白色:
解决此问题的一种方法是使用不同位置的复选框指定您自己的自定义 ExitDialog。这可行,但似乎只是为了更改一个控件的颜色需要做很多工作。解决同一问题的另一种方法是对生成的 MSI 进行后处理,以更改该特定 CheckBox 控件的控制表中的 X、Y 字段。javascript 代码如下所示:
var msiOpenDatabaseModeTransact = 1;
var filespec = WScript.Arguments(0);
var installer = new ActiveXObject("WindowsInstaller.Installer");
var database = installer.OpenDatabase(filespec, msiOpenDatabaseModeTransact);
var sql = "UPDATE `Control` SET `Control`.`Height` = '18', `Control`.`Width` = '170'," +
          " `Control`.`Y`='243', `Control`.`X`='10' " +
          "WHERE `Control`.`Dialog_`='ExitDialog' AND " +
          "  `Control`.`Control`='OptionalCheckBox'";
var view = database.OpenView(sql);
view.Execute();
view.Close();
database.Commit();
在生成 MSI 后(从 light.exe)将此代码作为命令行脚本(使用 cscript.exe)运行将产生一个看起来更专业的 ExitDialog:
简而言之:为每个安装程序创建唯一的 UpgradeCode,并自动为每个安装程序定义每个 Guid 的第一个字符,剩下的 31 个是唯一的。
示例 Config.wxi
<?xml version="1.0" encoding="utf-8"?>
<Include>
<!-- Upgrade code should not change unless you want to install
     a new product and have the old product remain installed,
     that is, both products existing as separate instances. -->
<?define UpgradeCode = "YOUR-GUID-HERE" ?>

<!-- Platform specific variables -->
<?if $(var.Platform) = x64 ?>
  <!-- Product name as you want it to appear in Add/Remove Programs-->
  <?define ProductName = "Foo 64 Bit [Live]" ?>
<?else ?>
  <?define ProductName =  "Foo [Live]" ?>
<?endif ?>

<!-- Directory name used as default installation location -->
<?define InstallName = "Foo [Live]" ?>

<!-- Registry key name used to store installation location -->
<?define InstallNameKey = "FooLive" ?>

<?define VDirName = "FooLive" ?>
<?define AppPoolName = "FooLiveAppPool" ?>
<?define DbName = "BlahBlahLive" ?>
</Include>
示例 Config.Common.wxi
<?xml version="1.0" encoding="utf-8"?>
<Include>
<!-- Auto-generate ProductCode for each build, release and upgrade -->
<?define ProductCode = "*" ?>

<!-- Note that 4th version (Revision) is ignored by Windows Installer -->
<?define ProductVersion = "1.0.0.0" ?>

<!-- Minimum version supported if product already installed and this is an upgrade -->
<!-- Note that 4th version (Revision) is ignored by Windows Installer -->
<?define MinimumUpgradeVersion = "0.0.0.0" ?>

<!-- Platform specific variables -->
<?if $(var.Platform) = x64 ?>
   <?define Win64 = "yes" ?>
   <?define PlatformProgramFilesFolder = "ProgramFiles64Folder" ?>
<?else ?>
   <?define Win64 = "no" ?>
   <?define PlatformProgramFilesFolder = "ProgramFilesFolder" ?>
<?endif ?>

<?define ProductManufacturer = "Foo Technologies"?>

<!-- Decimal Language ID (LCID) for the Product. Used for localization. -->
<?define ProductLanguage = "1033" ?>

<?define WebSiteName = "DefaultWebSite" ?>
<?define WebSitePort = "80" ?>

<?define DbServer = "(local)" ?>
</Include>
示例组件.wxs
<?xml version="1.0" encoding="utf-8"?>
<Wix xmlns="http://schemas.microsoft.com/wix/2006/wi">
  <!-- The pre-processor variable which allows the magic to happen :) -->
  <?include $(sys.CURRENTDIR)\Config.wxi?>
  <?include ..\Setup.Library\Config.Common.wxi?>
  <Fragment Id="ComponentsFragment">
    <Directory Id="TARGETDIR" Name="SourceDir">
      <Directory Id="$(var.PlatformProgramFilesFolder)">
        <Directory Id="INSTALLLOCATION" Name="$(var.InstallName)">
          <Component Id="ProductComponent" Guid="0XXXXXXX-XXXX-XXXX-XXXX-XXXXXXXXXXXX" KeyPath="yes">
          ...
注意:我现在建议将 Guid 属性排除在 Component 之外(相当于*),每个组件使用一个文件并将该文件设置为 keypath。这消除了对调用ModifyComponentsGuids和RevertComponentsGuids目标的需要,如下所示。不过,这可能不适用于您的所有组件。
示例 Setup.Live.wixproj
<Import Project="$(MSBuildExtensionsPath)\MSBuildCommunityTasks\MSBuild.Community.Tasks.Targets" />
<Target Name="BeforeBuild">
<CallTarget Targets="ModifyComponentsGuids" />
</Target>
<Target Name="AfterBuild">
<CallTarget Targets="RevertComponentsGuids" />
</Target>
<!-- Modify the first character of every Guid to create unique value for Live, Test and Training builds -->
<Target Name="ModifyComponentsGuids">
<FileUpdate Files="..\Setup.Library\Components.wxs" Regex="Guid="([a-f]|[A-F]|\d)" ReplacementText="Guid="A" />
</Target>
<!-- Revert the first character of every Guid back to initial value -->
<Target Name="RevertComponentsGuids">
<FileUpdate Files="..\Setup.Library\Components.wxs" Regex="Guid="([a-f]|[A-F]|\d)" ReplacementText="Guid="0" />
</Target>
最后的想法
更新 1: 自动生成组件 Guids无需调用 FileUpdate 任务,如果您为每个文件创建带有 Guid="*" 的组件,并将文件设置为 keypath。
更新 2:我们遇到的问题之一是,如果您不自动生成组件 Guid 并且构建失败,则需要手动删除临时文件。
更新 3:找到了一种方法来消除对 svn:externals 和临时文件创建的依赖。这使构建过程更具弹性(如果您不能通配您的 Guid,这是最好的选择),并且如果在光线或蜡烛中出现构建失败,则不那么脆弱。
更新 4:在 WiX 3.0+ 中支持使用实例转换的多个实例,绝对值得一看。
使用 Javascript CustomActions,因为它们非常简单
人们说MSI CustomActions 使用 Javascript 是错误的。给出的原因:难以调试,难以使其可靠。我不同意。调试并不难,当然不比 C++ 难。它只是不同。我发现用 Javascript 编写 CustomAction 超级简单,比使用 C++ 容易得多。快多了。同样可靠。
只有一个缺点:Javascript CustomAction 可以通过 Orca 提取,而 C/C++ CA 则需要逆向工程。如果您认为您的安装程序魔法是受保护的知识产权,您将希望避免使用脚本。
如果你使用脚本,你只需要从一些结构开始。这里有一些可以帮助您入门。
CustomAction 的 Javascript“样板”代码:
//
// CustomActions.js
//
// Template for WIX Custom Actions written in Javascript.
//
//
// Mon, 23 Nov 2009  10:54
//
// ===================================================================


// http://msdn.microsoft.com/en-us/library/sfw6660x(VS.85).aspx
var Buttons = {
        OkOnly           : 0,
        OkCancel         : 1,
        AbortRetryIgnore : 2,
        YesNoCancel      : 3
};

var Icons = {
        Critical         : 16,
        Question         : 32,
        Exclamation      : 48,
        Information      : 64
};

var MsgKind = {
        Error            : 0x01000000,
        Warning          : 0x02000000,
        User             : 0x03000000,
        Log              : 0x04000000
};

// http://msdn.microsoft.com/en-us/library/aa371254(VS.85).aspx
var MsiActionStatus = {
        None             : 0,
        Ok               : 1, // success
        Cancel           : 2,
        Abort            : 3,
        Retry            : 4, // aka suspend?
        Ignore           : 5  // skip remaining actions; this is not an error.
};


function MyCustomActionInJavascript_CA() {
    try {
        LogMessage("Hello from MyCustomActionInJavascript");
        // ...do work here...
        LogMessage("Goodbye from MyCustomActionInJavascript");
    }
    catch (exc1) {
        Session.Property("CA_EXCEPTION") = exc1.message ;
        LogException(exc1);
        return MsiActionStatus.Abort;
    }
    return MsiActionStatus.Ok;
}

// Pop a message box.  also spool a message into the MSI log, if it is enabled.
function LogException(exc) {
    var record = Session.Installer.CreateRecord(0);
    record.StringData(0) = "CustomAction: Exception: 0x" + decimalToHexString(exc.number) + " : " + exc.message;
    Session.Message(MsgKind.Error + Icons.Critical + Buttons.btnOkOnly, record);
}


// spool an informational message into the MSI log, if it is enabled.
function LogMessage(msg) {
    var record = Session.Installer.CreateRecord(0);
    record.StringData(0) = "CustomAction:: " + msg;
    Session.Message(MsgKind.Log, record);
}


// http://msdn.microsoft.com/en-us/library/d5fk67ky(VS.85).aspx
var WindowStyle = {
    Hidden : 0,
    Minimized : 1,
    Maximized : 2
};

// http://msdn.microsoft.com/en-us/library/314cz14s(v=VS.85).aspx
var OpenMode = {
    ForReading : 1,
    ForWriting : 2,
    ForAppending : 8
};

// http://msdn.microsoft.com/en-us/library/a72y2t1c(v=VS.85).aspx
var SpecialFolders = {
    WindowsFolder : 0,
    SystemFolder :  1,
    TemporaryFolder : 2
};

// Run a command via cmd.exe from within the MSI
function RunCmd(command)
{
    var wshell = new ActiveXObject("WScript.Shell");
    var fso = new ActiveXObject("Scripting.FileSystemObject");
    var tmpdir = fso.GetSpecialFolder(SpecialFolders.TemporaryFolder);
    var tmpFileName = fso.BuildPath(tmpdir, fso.GetTempName());

    LogMessage("shell.Run("+command+")");

    // use cmd.exe to redirect the output
    var rc = wshell.Run("%comspec% /c " + command + "> " + tmpFileName, WindowStyle.Hidden, true);
    LogMessage("shell.Run rc = "  + rc);

    // here, optionally parse the output of the command
    if (parseOutput) {
        var textStream = fso.OpenTextFile(tmpFileName, OpenMode.ForReading);
        while (!textStream.AtEndOfStream) {
            var oneLine = textStream.ReadLine();
            var line = ParseOneLine(oneLine);
                ...
        }
        textStream.Close();
    }

    if (deleteOutput) {
        fso.DeleteFile(tmpFileName);
    }

    return {
        rc : rc,
        outputfile : (deleteOutput) ? null : tmpFileName
    };
}
然后,使用以下内容注册自定义操作:
<Fragment>
  <Binary Id="IisScript_CA" SourceFile="CustomActions.js" />

  <CustomAction Id="CA.MyCustomAction"
              BinaryKey="IisScript_CA"
              JScriptCall="MyCustomActionInJavascript_CA"
              Execute="immediate"
              Return="check" />
</Fragmemt>
当然,您可以为多个自定义操作插入任意数量的 Javascript 函数。一个例子:我使用 Javascript 在 IIS 上执行 WMI 查询,以获取现有网站的列表,可以在其中安装 ISAPI 过滤器。该列表随后用于填充稍后在 UI 序列中显示的列表框。一切都很容易。
在 IIS7 上,没有用于 IIS 的 WMI 提供程序,因此我使用shell.Run()调用 appcmd.exe 的方法来执行工作。简单的。
使用 Msi 诊断日志记录获取详细的故障信息
msiexec /i Package.msi /l*v c:\Package.log
在哪里
包.msi是您的包裹的名称,并且
c:\Package.log是你想要输出日志的地方
Wix 介绍视频
哦和以“WiX 先生”Rob Mensching 为特色的随机 Wix 介绍视频对“概念性大图”很有帮助。
Peter Tate 已经展示了如何在单独的 wix 片段中定义可重用的 ComponentGroup 定义。与此相关的一些额外技巧:
目录别名
组件组片段不需要知道主产品 wxs 定义的目录。在您的组件组片段中,您可以谈论这样的文件夹:
<DirectoryRef Id="component1InstallFolder">
...
</DirectoryRef>
然后主产品可以为其目录之一(例如“productInstallFolder”)设置别名,如下所示:
<Directory Id="productInstallFolder" Name="ProductName">
   <!-- not subfolders (because no Name attribute) but aliases for parent! -->
   <Directory Id="component1InstallFolder"/>
   <Directory Id="component2InstallFolder"/>
</Directory>
依赖图
ComponentGroup 元素可以包含 ComponentGroupRef 子元素。如果您有大量可重用组件,并且它们之间存在复杂的依赖关系图,这将非常棒。您只需在其自己的片段中为每个组件设置一个 ComponentGroup 并声明依赖项,如下所示:
<ComponentGroup Id="B">
   <ComponentRef Id="_B" />
   <ComponentGroupRef Id="A">
</ComponentGroup>
如果您现在在设置中引用组件组“B”,因为它是应用程序的直接依赖项,即使应用程序作者从未意识到它是“B”的依赖项,它也会自动拉入组件组“A”。只要您没有任何循环依赖项,它就“正常工作”。
可重用的wixlib
如果您使用 lit.exe 将 big-pool-o-reusable-components 编译成可重用的 wixlib,则上述依赖关系图的想法效果最好。创建应用程序设置时,您可以像 wixobj 文件一样引用此 wixlib。Candle.exe 链接器将自动消除任何未被主产品 wxs 文件“拉入”的片段。
使用 Heat.exe 砸脸并在痛苦的大型安装中造成“史诗般的 Pwnage”
扩展Si和
Robert-P关于热量的答案。
翻译:(使用 heat 来避免手动将单个文件输入到项目中,并自动构建以使整个过程更容易。)
WiX 2.0 Heat 语法详细
对于较新的版本(与旧版本没有什么不同,但可能存在令人讨厌的语法更改......)从 cmd.exe 转到 Heat 所在的目录,然后输入 heat 但我在这里有一个示例以寻求帮助如果需要,使用更新的版本。
在Visual Studio 2010中将以下内容添加到您的构建事件中。
(右键单击项目->属性->构建事件->预构建事件)
$(WIX)bin\heat.exe" dir "$(EnviromentVariable)" -cg GroupVariable -gg -scom -sreg -sfrag -
srd -dr INSTALLLOCATION -var env.LogicPath -out "$(FragmentDir)\FileName.wxs
-gg
运行加热时生成 Guid(如执行上述命令时)
-scom
不要抓取“COM文件”
-sreg
不要抢“注册表文件”
-sfrag
不要抢“碎片”
-srd
不要抓住“根目录”
目录
dir 表示您希望 Heat 在文件夹中查找
“$(环境变量)”
您将添加到(右键单击项目,转到属性)项目属性->构建部分中的预处理器变量的变量的名称,其中显示定义预处理器变量(假设 Visual Studio 2010)
例子:
环境变量=C:\Project\bin\Debug;
没有双引号,但以分号结尾
-cg 组变量
将从创建到主 wxs 文件的片段中引用的 ComponentGroup
片段目录
将存储输出 wxs 片段的片段目录
文件名.wxs
文件名
完整教程在这里,非常有帮助
我很惊讶没有人提到在构建过程中使用 T4 生成 WXS 文件。我通过 Henry Lee @New Age Solutions了解了这一点。
本质上,您创建了一个自定义 MSBuild 任务来执行 T4 模板,并且该模板在 Wix 项目编译之前输出 WXS。这允许您(取决于您如何实现它)自动包含编译另一个解决方案的所有程序集输出(这意味着您不再需要在每次添加新程序集时编辑 wxs)。
Including COM Objects:
heat generates all most (if not all) the registry entries and other configuration needed for them. Rejoice!
Including Managed COM Objects (aka, .NET or C# COM objects)
Using heat on a managed COM object will give you an almost complete wix document.
If you don't need the library available in the GAC (ie, globally available: MOST of the time you do not need this with your .NET assemblies anyway - you've probably done something wrong at this point if it's not intended to be a shared library) you will want to make sure to update the CodeBase registry key to be set to [#ComponentName]. If you ARE planning on installing it to the GAC (eg, you've made some new awesome common library that everyone will want to use) you must remove this entry, and add two new attributes to the File element: Assembly and KeyPath. Assembly should be set to ".net" and KeyPath should be set to "yes".
However, some environments (especially anything with managed memory such as scripting languages) will need access to the Typelib as well. Make sure to run heat on your typelib and include it. heat will generate all the needed registry keys. How cool is that?
安装到C:\ProductName
一些应用程序需要安装到C:\ProductName或类似的东西,但网络中 99.9%(如果不是 100%)的示例安装到C:\Program Files\CompanyName\ProductName.
以下代码可用于将TARGETDIR属性设置为驱动器的根目录C:(取自WiX-users list):
<CustomAction Id="AssignTargetDir" Property="TARGETDIR" Value="C:\" Execute="firstSequence" />
<InstallUISequence>
    <Custom Action="AssignTargetDir" Before="CostInitialize">TARGETDIR=""</Custom>
</InstallUISequence>
<InstallExecuteSequence>
    <Custom Action="AssignTargetDir" Before="CostInitialize">TARGETDIR=""</Custom>
</InstallExecuteSequence>
注意:默认情况下,TARGETDIR 不指向C:\! 而是指向ROOTDRIVEwhich 又指向具有最多可用空间的驱动器的根目录(请参见此处) - 这不一定是C:驱动器。可能有另一个硬盘驱动器、分区或 USB 驱动器!
然后,在您的标签下方的某处<Product ...>,您像往常一样需要以下目录标签:
<Directory Id="TARGETDIR" Name="SourceDir">
    <Directory Id="APPLICATIONFOLDER" Name="$(var.ProductName)">
        <!-- your content goes here... -->
    </Directory>
</Directory>
编辑对话框
编辑对话框的一项很好的功能是在 4.0.1.7090(或更高版本)中使用 SharpDevelop。借助此工具,可以在设计视图中打开、预览和编辑独立对话框(来自 WiX 源的 wxs 文件,例如 InstallDirDlg.wxs)。
环境变量
在将你的 Wxs 文件编译成 wixobj 代码时,你可以利用环境变量来确定各种信息。例如,假设您想更改项目中包含的文件。假设您有一个名为 RELEASE_MODE 的环境变量,您在构建 MSI 之前设置了它(使用脚本或手动,没关系)在您的 wix 源中,您可以执行以下操作:
<define FILESOURCE = c:\source\output\bin\$(env.RELEASE_MODE) >
然后稍后在您的代码中,使用它来即时更改您的 wxs 文档,例如:
<Icon Id="myicon.ico" SourceFile="$(var.FILESOURCE)" />
使用 RobM 特殊的“记住属性”模式
http://robmensching.com/blog/posts/2010/5/2/The-WiX-toolsets-Remember-Property-pattern
为使用托管代码 (C#) 编写的 WIX 创建自定义操作,无需 Votive
设置 IIS enable32BitAppOnWin64 标志http://trycatchfail.com/blog/post/WiX-Snippet-change-enable32BitAppOnWin64.aspx
<InstallExecuteSequence>
   <RemoveExistingProducts After="InstallFinalize" />
   <Custom Action="ConfigureAppPool" After="InstallFinalize" >
     <![CDATA[NOT Installed AND VersionNT64 >= 600]]>
   </Custom>
</InstallExecuteSequence>

<CustomAction Id="ConfigureAppPool" Return="check" Directory="TARGETDIR" ExeCommand="[SystemFolder]inetsrv\appcmd set apppool /apppool.name:[APPPOOLNAME] /enable32BitAppOnWin64:false" />
我们在 GUI 的第一个屏幕中的某处(微小)显示产品版本。因为人们在每次选择正确的版本时都会犯错误。(并让我们的开发人员搜索年龄......)
我们设置了 TFSBuild 以生成转换(.mst 文件),并为我们的不同环境配置配置。(我们知道我们需要部署到的所有环境)。
由于格兰特霍利迪的原始博客文章已关闭,我将其内容复制粘贴在这里:
用于从 XML 生成 MSI 转换文件的 MSBuild 任务 2008 年 3 月 11 日
在我之前的文章中,我描述了如何使用 MSI 转换 (*.mst) 文件将特定于环境的配置设置与通用 MSI 包分开。
尽管这为您的配置提供了一定程度的灵活性,但转换文件有两个缺点:
幸运的是,我们可以使用 Microsoft Windows Installer 对象库 (c:windowssystem32msi.dll) 打开 MSI“数据库”并创建转换文件。
再次感谢Alex Shevchuk - 从 MSI 到 WiX - 第 7 部分- 使用转换自定义安装,向我们展示了如何使用 VbScript 实现这一目标。基本上我所做的一切都是以 Alex 的例子,并使用 Interop.WindowsInstaller.dll 我实现了一个 MSBuild 任务。MSBuild 任务
在此处下载源代码和示例 transforms.xml(~7Kb 压缩 VS2008 解决方案)
Modify the "Ready to install?" dialog (aka VerifyReadyDlg) to provide a summary of choices made.
It looks like this:
alt text http://i46.tinypic.com/s4th7t.jpg
Do this with a Javascript CustomAction:
Javascript code:
// http://msdn.microsoft.com/en-us/library/aa372516(VS.85).aspx
var MsiViewModify =
    {
        Refresh          : 0,
        Insert           : 1,
        Update           : 2,
        Assign           : 3,
        Replace          : 4,
        Merge            : 5,
        Delete           : 6,
        InsertTemporary  : 7,   // cannot permanently modify the MSI during install
        Validate         : 8,
        ValidateNew      : 9,
        ValidateField    : 10,
        ValidateDelete   : 11
    };


// http://msdn.microsoft.com/en-us/library/sfw6660x(VS.85).aspx
var Buttons =
    {
        OkOnly           : 0,
        OkCancel         : 1,
        AbortRetryIgnore : 2,
        YesNoCancel      : 3
    };

var Icons=
    {
        Critical         : 16,
        Question         : 32,
        Exclamation      : 48,
        Information      : 64
    }

var MsgKind =
    {
        Error            : 0x01000000,
        Warning          : 0x02000000,
        User             : 0x03000000,
        Log              : 0x04000000
    };

// http://msdn.microsoft.com/en-us/library/aa371254(VS.85).aspx
var MsiActionStatus =
    {
        None             : 0,
        Ok               : 1, // success
        Cancel           : 2,
        Abort            : 3,
        Retry            : 4, // aka suspend?
        Ignore           : 5  // skip remaining actions; this is not an error.
    };

function UpdateReadyDialog_CA(sitename)
{
    try
    {
        // can retrieve properties from the install session like this:
        var selectedWebSiteId = Session.Property("MSI_PROPERTY_HERE");

        // can retrieve requested feature install state like this:
        var fInstallRequested   = Session.FeatureRequestState("F.FeatureName");

        var text1 = "This is line 1 of text in the VerifyReadyDlg";

        var text2 = "This is the second line of custom text";

        var controlView     = Session.Database.OpenView("SELECT * FROM Control");
        controlView.Execute();

        var rec             = Session.Installer.CreateRecord(12);
        rec.StringData(1)   = "VerifyReadyDlg";    // Dialog_
        rec.StringData(2)   = "CustomVerifyText1"; // Control - can be any name
        rec.StringData(3)   = "Text";              // Type
        rec.IntegerData(4)  = 25;                  // X
        rec.IntegerData(5)  = 60;                  // Y
        rec.IntegerData(6)  = 320;                 // Width
        rec.IntegerData(7)  = 85;                  // Height
        rec.IntegerData(8)  = 2;                   // Attributes
        rec.StringData(9)   = "";                  // Property
        rec.StringData(10)  = vText1;              // Text
        rec.StringData(11)  = "";                  // Control_Next
        rec.StringData(12)  = "";                  // Help
        controlView.Modify(MsiViewModify.InsertTemporary, rec);

        rec                 = Session.Installer.CreateRecord(12);
        rec.StringData(1)   = "VerifyReadyDlg";    // Dialog_
        rec.StringData(2)   = "CustomVerifyText2"; // Control - any unique name
        rec.StringData(3)   = "Text";              // Type
        rec.IntegerData(4)  = 25;                  // X
        rec.IntegerData(5)  = 160;                 // Y
        rec.IntegerData(6)  = 320;                 // Width
        rec.IntegerData(7)  = 65;                  // Height
        rec.IntegerData(8)  = 2;                   // Attributes
        rec.StringData(9)   = "";                  // Property
        rec.StringData(10)  = text2;               // Text
        rec.StringData(11)  = "";                  // Control_Next
        rec.StringData(12)  = "";                  // Help
        controlView.Modify(MsiViewModify.InsertTemporary, rec);

        controlView.Close();
    }
    catch (exc1)
    {
        Session.Property("CA_EXCEPTION") = exc1.message ;
        LogException("UpdatePropsWithSelectedWebSite", exc1);
        return MsiActionStatus.Abort;
    }
    return MsiActionStatus.Ok;
}


function LogException(loc, exc)
{
    var record = Session.Installer.CreateRecord(0);
    record.StringData(0) = "Exception {" + loc + "}: " + exc.number + " : " + exc.message;
    Session.Message(MsgKind.Error + Icons.Critical + Buttons.btnOkOnly, record);
}
Declare the Javascript CA:
<Fragment>
  <Binary Id="IisScript_CA" SourceFile="CustomActions.js" />

  <CustomAction Id="CA.UpdateReadyDialog"
              BinaryKey="IisScript_CA"
              JScriptCall="UpdateReadyDialog_CA"
              Execute="immediate"
              Return="check" />
</Fragment>
Attach the CA to a button. In this example, the CA is fired when Next is clicked from the CustomizeDlg:
<UI ...>
  <Publish Dialog="CustomizeDlg" Control="Next" Event="DoAction"
           Value="CA.UpdateReadyDialog" Order="1"/>
</UI>
Related SO Question: How can I set, at runtime, the text to be displayed in VerifyReadyDlg?
将可以单独修补的组件放在自己的片段中
它适用于制作产品安装程序和补丁,如果您在片段中包含任何组件,则必须在该片段中包含所有组件。在构建安装程序的情况下,如果您错过任何组件引用,您将收到来自 light.exe 的链接错误。但是,当您制作补丁时,如果您在片段中包含单个组件引用,则该片段中所有更改的组件都将显示在您的补丁中。
像这样:
<Fragment>
    <DirectoryRef Id="SampleProductFolder">
        <Component Id="SampleComponent1" Guid="{C28843DA-EF08-41CC-BA75-D2B99D8A1983}" DiskId="1">
            <File Id="SampleFile1" Source=".\$(var.Version)f\Sample1.txt" />
        </Component>
    </DirectoryRef>
</Fragment>

<Fragment>
    <DirectoryRef Id="SampleProductFolder">
        <Component Id="SampleComponent2" Guid="{6CEA5599-E7B0-4D65-93AA-0F2F64402B22}" DiskId="1">
           <File Id="SampleFile2" Source=".\$(var.Version)f\Sample2.txt" />
        </Component>
    </DirectoryRef>
</Fragment>

<Fragment>
    <DirectoryRef Id="SampleProductFolder">
        <Component Id="SampleComponent3" Guid="{4030BAC9-FAB3-426B-8D1E-DC1E2F72C2FC}" DiskId="1">
           <File Id="SampleFile3" Source=".\$(var.Version)f\Sample3.txt" />
        </Component>
    </DirectoryRef>
</Fragment>
而不是这个:
<Fragment>
    <DirectoryRef Id="SampleProductFolder">
        <Component Id="SampleComponent1" Guid="{C28843DA-EF08-41CC-BA75-D2B99D8A1983}" DiskId="1">
            <File Id="SampleFile1" Source=".\$(var.Version)\Sample1.txt" />
        </Component>

        <Component Id="SampleComponent2" Guid="{6CEA5599-E7B0-4D65-93AA-0F2F64402B22}" DiskId="1">
           <File Id="SampleFile2" Source=".\$(var.Version)\Sample2.txt" />
        </Component>

        <Component Id="SampleComponent3" Guid="{4030BAC9-FAB3-426B-8D1E-DC1E2F72C2FC}" DiskId="1">
           <File Id="SampleFile3" Source=".\$(var.Version)\Sample3.txt" />
        </Component>
    </DirectoryRef>
</Fragment>
此外,当使用 WiX.chm 帮助文件中的“使用 Purely WiX”主题进行修补时,使用以下过程生成修补程序:
torch.exe -p -xi 1.0\product.wixpdb 1.1\product.wixpdb -out patch\diff.wixmst
candle.exe patch.wxs
light.exe patch.wixobj -out patch\patch.wixmsp
pyro.exe patch\patch.wixmsp -out patch\patch.msp -t RTM patch\diff.wixmst
仅使用单独片段中的组件构建 1.1 版本的 product.wixpdb 是不够的。因此,请务必在发货前正确分割您的产品。
在部署安装包之前,我总是控制它的内容。
这只是在命令行中的一个简单调用(根据 Terrences 的帖子)打开命令行并输入
msiexec /a Package.msi /qb TARGETDIR="%CD%\Extract" /l*vx "%CD\install.log%"
这会将包内容提取到具有当前路径的子目录“Extract”。
1) 编译 wix 源代码时,light.exe 必须在命令行中引用 WixUIExtension.dll。为此,请使用命令行开关 -ext。
2) 如果当您添加对 WixUIExtension.dll 的引用时,您的项目无法编译,这很可能是因为对话框 ID 冲突,即您的项目使用的对话框 ID 与 WixUIExtension.dll 中的某些标准对话框相同,为您的对话框提供不同的 ID。这是一个很常见的问题。
3) 您的许可证对话框必须具有 ScrollableText 控件,其 id 为“LicenseText”。Wix 在打印时会准确搜索此控件名称。
<Control Id="LicenseText" Type="ScrollableText" X="20" Y="60" Width="330" Height="160" Sunken="yes" TabSkip="no">
    <Text SourceFile="License.rtf" />
</Control>
和一个引用自定义操作的 PushButton
<Control Type="PushButton" Id="PrintButton" Width="57" Height="17" X="19" Y="244" Text="Print">
    <Publish Event="DoAction" Value="PrintEula">1</Publish>
</Control>
4) 使用 Id="PrintEula" 定义 CustomAction,如下所示:
<CustomAction Id="PrintEula" BinaryKey="WixUIWixca" DllEntry="PrintEula" Return="ignore" Execute="immediate" />
注意:与 Wix2.0 相比,Wix3.0 中的 BinaryKey 不同,并且必须完全是“WixUIWixca”(区分大小写)。
当用户按下按钮时,他/她将看到标准的选择打印机对话框,并且能够从那里进行打印。
NB 这个片段本质上与REGASM Assembly.dll /codebase相同
这个示例中发生了一些事情,所以这里是代码,我会在之后解释它......
  <Wix xmlns="http://schemas.microsoft.com/wix/2006/wi">
  <?include $(sys.CURRENTDIR)\Config.wxi?>
  <?if $(var.Win64) ?>
  <?define CLSIDRoots = "CLSID;Wow6432Node\CLSID"?>
  <?else ?>
  <?define CLSIDRoots = "CLSID"?>
  <?endif?>
  <!-- ASCOM Driver Assembly with related COM registrations -->
  <Fragment>
    <DirectoryRef Id="INSTALLLOCATION" />
  </Fragment>
  <Fragment>
    <ComponentGroup Id="cgAscomDriver">
      <Component Id="cmpAscomDriver" Directory="INSTALLLOCATION" Guid="{0267031F-991D-4D88-A748-00EC6604171E}">
        <File Id="filDriverAssembly" Source="$(var.TiGra.Astronomy.AWRDriveSystem.TargetPath)" KeyPath="yes" Vital="yes" Assembly=".net" AssemblyApplication="filDriverAssembly"  />
        <RegistryKey Root="HKCR" Key="$(var.DriverId)"  Action="createAndRemoveOnUninstall">
          <RegistryValue Type="string" Value="$(var.DriverTypeName)"/>
          <RegistryKey Key="CLSID">
            <RegistryValue Type="string" Value="$(var.DriverGuid)" />
          </RegistryKey>
        </RegistryKey>
        <?foreach CLSID in $(var.CLSIDRoots) ?>
        <RegistryKey Root="HKCR" Key="$(var.CLSID)" Action="none">
          <RegistryKey Key="$(var.DriverGuid)" Action="createAndRemoveOnUninstall">
            <RegistryValue Type="string" Value="$(var.DriverTypeName)"/>
            <RegistryKey Key="InprocServer32">
              <RegistryValue Type="string" Value="mscoree.dll" />
              <RegistryValue Type="string" Name="ThreadingModel" Value="Both"/>
              <RegistryValue Type="string" Name="Class" Value="$(var.DriverTypeName)"/>
              <RegistryValue Type="string" Name="Assembly" Value="!(bind.assemblyFullname.filDriverAssembly)" />
              <RegistryValue Type="string" Name="RuntimeVersion" Value="v2.0.50727"/>
              <RegistryValue Type="string" Name="CodeBase" Value="file:///[#filDriverAssembly]" />
              <RegistryKey Key="!(bind.fileVersion.filDriverAssembly)" >
                <RegistryValue Type="string" Name="Class" Value="$(var.DriverTypeName)"/>
                <RegistryValue Type="string" Name="Assembly" Value="!(bind.assemblyFullname.filDriverAssembly)" />
                <RegistryValue Type="string" Name="RuntimeVersion" Value="v2.0.50727"/>
                <RegistryValue Type="string" Name="CodeBase" Value="file:///[#filDriverAssembly]" />
              </RegistryKey>
            </RegistryKey>
            <RegistryKey Key="ProgId" Action="createAndRemoveOnUninstall">
              <RegistryValue Type="string" Value="$(var.DriverId)" />
            </RegistryKey>
            <RegistryKey Key="Implemented Categories" Action="createAndRemoveOnUninstall" >
              <RegistryKey Key="{62C8FE65-4EBB-45e7-B440-6E39B2CDBF29}" Action="createAndRemoveOnUninstall" />
            </RegistryKey>
          </RegistryKey>
        </RegistryKey>
        <?endforeach?>
      </Component>
    </ComponentGroup>
  </Fragment>
</Wix>
如果您想知道,这实际上是针对ASCOM Telescope Driver的。
首先,我听取了上面的建议,在一个单独的文件中创建了一些平台变量,您可以通过 XML 看到这些变量。
靠近顶部的 if-then-else 部分处理 x86 与 x64 的兼容性。我的程序集以 x64 系统上的“任何 CPU”为目标,我需要注册两次,一次在 64 位注册表中,一次在 32 位Wow6432Node区域中。if-then-else 为此设置了我,foreach稍后将在循环中使用这些值。这样,我只需编写一次注册表项(DRY 原则)。
file 元素指定正在安装和注册的实际程序集 dll:
<File Id="filDriverAssembly" Source="$(var.TiGra.Astronomy.AWRDriveSystem.TargetPath)" KeyPath="yes" Vital="yes" Assembly=".net" AssemblyApplication="filDriverAssembly" />
没有什么革命性的,但请注意Assembly=".net"- 仅此属性会导致程序集被放入 GAC,这不是我想要的。使用AssemblyApplication属性指向自身只是阻止 Wix 将文件放入 GAC 的一种方法。现在,Wix 知道它是一个 .net 程序集,但它允许我在我的 XML 中使用某些绑定变量,例如!(bind.assemblyFullname.filDriverAssembly)获取程序集全名。
设置该DISABLEADVTSHORTCUTS属性以强制安装程序中的所有广告快捷方式成为常规快捷方式,并且您不需要包含一个虚拟 reg 键来用作键路径。
<Property Id="DISABLEADVTSHORTCUTS" Value="1"/>
我认为 Windows Installer 4.0 或更高版本是必需的。
这是一种帮助大型 Web 项目验证已部署文件的数量是否与内置于 MSI(或合并模块)中的文件数量相匹配的方法。我刚刚针对我们的主应用程序(仍在开发中)运行了自定义 MSBuild 任务,它捡起了很多丢失的文件,主要是图像,但一些 javascript 文件已经溜走了!
这种方法(通过挂钩到 WiX 项目的 AfterBuild 目标来查看 MSI 的文件表)可以适用于您可以访问完整的预期文件列表的其他应用程序类型。
这是一个很好的结构,但根据我的经验,我想知道您如何解决这些条件:
A. 您的安装似乎都落在同一个目的地。如果用户需要一次安装所有 3 个版本,您的流程是否允许这样做。他们能清楚地告诉他们正在触发的每个可执行文件的哪个版本吗?
B. 您如何处理存在于 TEST 和/或 TRAINING 但尚未在 LIVE 中的新文件?
创建一个具有自定义操作的 UI,该操作将设置一个变量,并且 UI 将根据自定义操作中设置的变量禁用/启用下一个按钮(或类似按钮)。
不像你想象的那么简单,也不是太难,只是没有在任何地方记录!
当安装不允许卸载或重新安装且不回滚时执行强制重新安装。
VBscript 脚本用于覆盖因任何原因未卸载的安装..
Dim objShell
set objShell = wscript.createObject("wscript.shell")

iReturn = objShell.Run("CMD /K MsiExec.exe /I ""C:\Users\TheUser\Documents\Visual Studio 2010\Projects\InstallationTarget\HelloInstaller\bin\Debug\HelloInstaller.msi"" REINSTALLMODE=vomus REINSTALL=ALL",,True)
Fix the ProgressDlg so that it displays properly.
I've increased the font size for my installer from 8 to 10, to make the font a more human, usable scale on high-res monitors. I do this with this XML magic:
<UI Id="MyCustomUI">
  <TextStyle Id="WixUI_Font_Normal" FaceName="Tahoma" Size="10" />
  <TextStyle Id="WixUI_Font_Big"    FaceName="Tahoma" Size="12" />
  <TextStyle Id="WixUI_Font_Bigger" FaceName="Tahoma" Size="14" />
  <TextStyle Id="WixUI_Font_Title"  FaceName="Tahoma" Size="12" Bold="yes" />

  <Property Id="DefaultUIFont" Value="WixUI_Font_Normal" />
</UI>
But this means the ProgressDlg doesn't display properly any longer. This is the one that displays the progress of the install, right at the very end. The ActionText gets clipped, so descenders on letters like g and j do not display. Fix this by adjusting the size and position of the various controls on the Progressdialog, in a post-processing Javascript. Run this script after generating the MSI:
var msiOpenDatabaseModeTransact = 1;
var filespec = WScript.Arguments(0);
var installer = new ActiveXObject("WindowsInstaller.Installer");
var database = installer.OpenDatabase(filespec, msiOpenDatabaseModeTransact);

// The text on the exit dialog is too close to the title.  This
// step moves the text down from Y=70 to Y=90, about one line.
sql = "UPDATE `Control` SET `Control`.`Y` = '90' " +
    "WHERE `Control`.`Dialog_`='ExitDialog' AND `Control`.`Control`='Description'";
view = database.OpenView(sql);
view.Execute();
view.Close();

// The progressbar is too close to the status text on the Progress dialog.
// This step moves the progressbar down from Y=115 to Y=118, about 1/3 line.
sql = "UPDATE `Control` SET `Control`.`Y` = '118' " +
    "WHERE `Control`.`Dialog_`='ProgressDlg' AND `Control`.`Control`='ProgressBar'";
view = database.OpenView(sql);
view.Execute();
view.Close();

// The StatusLabel and ActionText controls are too short on the Progress dialog,
// which means the bottom of the text is cut off.  This step
// increases the height from 10 to 16.
sql = "UPDATE `Control` SET `Control`.`Height` = '16' " +
    "WHERE `Control`.`Dialog_`='ProgressDlg' AND `Control`.`Control`='StatusLabel'";
view = database.OpenView(sql);
view.Execute();
view.Close();
sql = "UPDATE `Control` SET `Control`.`Height` = '16' " +
    "WHERE `Control`.`Dialog_`='ProgressDlg' AND `Control`.`Control`='ActionText'";
view = database.OpenView(sql);
view.Execute();
view.Close();

database.Commit();